How To Set Default Folder View For All Folders in Windows 10
How To Set Default Folder View For All Folders in Windows 10
How To Set Default Folder View For All Folders in Windows 10
Windows 10 is a versatile operating system that offers a lot of customization options to its users. One of the customization options that are often overlooked is setting the default folder view for all folders in Windows 10. By default, Windows 10 will display folders using the same view options as the last folder that was viewed. This can be problematic if you have a folder that needs to be viewed differently than the others. In this article, we will go over how to set the default folder view for all folders in Windows 10.
Step 1: Open File Explorer
To set the default folder view for all folders in Windows 10, you will first need to open File Explorer. There are several ways to do this, but the easiest is to click on the File Explorer icon in the taskbar.
Step 2: Select the View tab
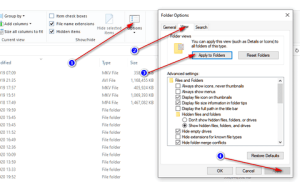
Once File Explorer is open, you will need to select the View tab from the ribbon at the top of the window.
Step 3: Click on Options
In the View tab, you will see several options, including Options, which is located on the right side of the ribbon. Click on Options to open the Folder Options dialog box.
Step 4: Select the View tab in the Folder Options dialog box
In the Folder Options dialog box, you will see several tabs. Select the View tab to access the options related to folder view.
Step 5: Click on Apply to Folders
In the View tab, you will see an option that says “Apply to Folders.” This option is located at the bottom of the dialog box. Click on this option to apply the current view settings to all folders on your computer.
Step 6: Confirm your selection
When you click on Apply to Folders, you will be asked to confirm your selection. Click Yes to apply the current view settings to all folders on your computer.
Step 7: Adjust your view settings
Once you have applied the current view settings to all folders on your computer, you can adjust the view settings to your liking. For example, if you want all folders to display as thumbnails, you can select the Thumbnails option in the View tab. You can also adjust the size of the thumbnails by selecting the Options button in the same tab.
Step 8: Save your changes
Once you have adjusted the view settings to your liking, you can save your changes by clicking on the Apply button in the Folder Options dialog box. You will be prompted to confirm your selection, so click Yes to save your changes.
Step 9: Close the Folder Options dialog box
After you have saved your changes, you can close the Folder Options dialog box by clicking on the OK button.
Step 10: Check your changes
To ensure that your changes have been applied to all folders on your computer, you can open File Explorer and navigate to a folder. The folder should now display using the view settings that you have set as the default.
Conclusion
Setting the default folder view for all folders in Windows 10 is a simple process that can save you a lot of time and frustration. By following the steps outlined in this article, you can set the default view settings for all folders on your computer, and customize the view settings to your liking. 0 0 0.
How To Set Default Folder View For All Folders in Windows 10


